Seiten

Queens own Rangers - Dragoons


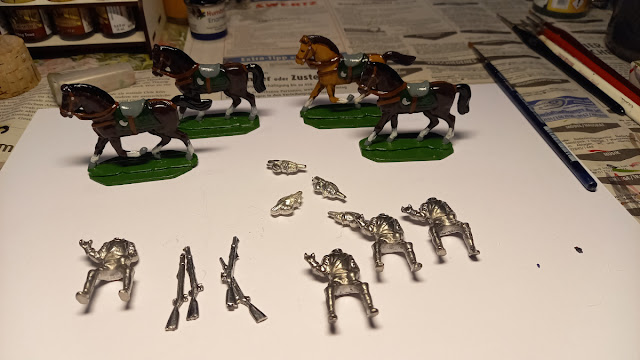
These poses are a little bit, lets say, 'artificial'. Who would carry a musket like that?  But the moulds are from the 70's and are meant to produce 'simple' toy soldiers and this is what my AWI project is about. All my cavalry troops in this project will be very small, so this is a full unit. Maybe I add some men on foot later.

"An Illustrated Encyclopedia of Uniforms 1775-1783: The American Revolutionary War", Lorenz Books 2008. My only book with AWI uniforms and a very good one I think.


The shape of things to come

Toy soldiers from Meisterzinn moulds waiting to be painted for my AWI project. 

Modular gaming table - Where to go from here


I did not make all the boards I may need and so I have to make some more. But not in a hurry, not in a forced manner. At the moment I need a break. 

The boards I am going to build next:

  • 4-6 cobblestone boards for villages
  • 2-3 grounds for farmhouses
  • 2-3 one-field hills 
  • 1-2 two-field hills
  • 1 four-field plateau (for castles?)
  • some dirt roads
  • 8-12 brooks
  • a T-section for rivers
I also need one or two new bridges that fit to the streets and rivers.


How about a Vauban fortress?


Ok guys, has anybody seen the bridge?


CRISIS 2021 canceled...

Yesterday I talked to  a friend on the phone who told me that he is really looking forward to the CRISIS in Antwerp to be inspired again. This morning I checked their website only to find that the 2021 event has been canceled. Due to the Covid-19 uncertainties it is still not possible.

And the President of the Antwerp Tin Soldiers Club wrote what I said very often before : 

"On top of that the Brexit situation with more than 50% of the traders that are usually attending no longer able to do so without huge customs problems doesn't make it any easier either. "

Let's face the reality : The CRISIS, as we used to know it, is history.

When it comes back - and it will, I am sure - it will be much smaller.

Building a Modular Gaming Table - Part 17 / Day 14 - Mission accomplished... for the moment

Forty-five boards are done and three more street boards are nearly ready. All in all I made 48 pieces in 14 days. Not enough for all the gaming situations but a usable amount to start with.


And as we can see : I repainted the frame.


The boards stored in a cabinet. They don't need very much space. If I dedicate another shelf to the boards I can store about 100 of them without any problem .

Conclusion and Observations

  1. The boards are fine, but I'm not really happy with the size of the table frame. I don't like the length-to-width ratio. A side that is to narrow has a too strong influence on all strategic movements or dispositions. So I'm going to build a bigger frame. I am thinking of a table that is easy to assemble, a structure with foldable legs. Someday.

  2. Mixing railroad landscaping pieces with plastic plants does not look right. I have to go with the railroad stuff and maybe change or paint some of the plastic stuff if I want to use it.

  3. Having put some houses on this table it somehow struck me : We often have the impression that smaller houses fit the picture on a wargaming table better than the ones that have the 'correct' size (if ever). Magically smaller looks better. Suddenly I saw the reason. Our mind does not compare the size of the miniatures to the houses, it sees big houses dominating the scenery on a too small table. Is this an argument for smaller houses or a bigger tables?


Building a Modular Gaming Table - Part 16 / Day 13 - Last details

Nearly there. At the end of this building frenzy I am running out of steam. Only doing some detailing and painting the streets today.

Cleaning the water with a wet brush.

Punching holes...

...to plant reed.

Swamp board. The reed is cut down because big plants would be damaged anyway when the boards are stored.

Dark grey color for the cobblestone streets. Later brushed over with a lighter grey.

Looks like a street to me.

Done for today.


Building a Modular Gaming Table - Part 15 / Day 12 - Only small progress but the end is near

Not so productive today, I had too much else to do. Did detailing the lake/swamp boards. I am near  to end of the first and biggest batch of the terrain boards. 


Building a Modular Gaming Table - Part 14 / Day 11 - Walking on eggshells

This is a very old and I think nowadays almost unknown modelling technique : making cobblestone streets from eggshells.

First of all a size comparison. The 10 cm wide street that I mentioned days ago looks more or less correct with miniatures from 28 to 54 mm size. Its a full road for the small guys, a good one for 40 mm soldiers and still wide enough for the big ones. 


And it has to be enough because nothing really suits 54 mm miniatures, most of the time it is impossible to support them with things that fit to their scale. A castle for example that is in the 54 mm scale would use up half of the room I am sitting in now.

Making the eggshell streets

The process is easy. First : Eat the eggs. No, I am kidding, simply collect eggshells for a while. Peel off the membrane and keep only the shell itself.

Apply glue on the surface of your road, put a piece of eggshell on the glue and press it down so that it breaks into small pieces. Arrange the pieces with a pointed tool.


The whole process goes faster than one may think. For example, cutting carton into pieces and gluing them to the board would have cost more time and would mean a lot more work. And it would never look that random. (if wanted)


Yes, I could have bought ready made cobblestone foil or something. But that would make me depend on them. I can make or repair eggshell streets as much or often I want (... and as long as I eat eggs). And I can make small ways or places with it and use the same stuff wherever I want.

At the end of the day I paved four street pieces and started a fifth. But I am running out of eggshells now. Hmmm, what are we going to eat today?


Building a Modular Gaming Terrain - Part 13 / Day 10 - Detailing

 A lot of time consuming detailing today but no picture of all the boards I made. 


A really nice effect brings so called foliage. I had that lying around for ages and I never expected to ever use it. But glued to the grass - preferably somewhere to conceal edges - looks nice and adds structure to the landscape.


PVA glue dissolved in water (about 1:10 or thinner) and applied drop by drop with a pipette helps to fix loose grass fibers. (It dries transparent, the white color disappears.)


Finally the resin on the lake/swamp boards has hardenend.


Building a Modular Gaming Table - Part 12 / Day 9 - Grass is everywhere

Today I am going to add the grass mats and the loose grass fibers to all the parts that are ready for that. As we can see I am making more and more serial work.  Not much to say about, only that I needed the whole day.


Building a Modular Gaming Table - Part 11 / Day 8 - A stream of rivers

The rivers are getting wet today.  The one mistake I made is: some of them already have the grass mat on the embankment. And this makes covering the river with gloss varnish in the end dangerous since there are always some fibers falling of.


Step 1: Paint "Dark Sky" with a one inch brush on the river in the same direction that the water flows. All over the surface by the way, this here is not ready


Step 2 : Adding structure with a little bit of "Ultramarine Blue".


Step 3: And a "Angel Green" here and there. Very wet and thin. You can repeat all three steps if something does not look 'right'.


Finally, the water is coated with gloss varnish. I use a varnish from an art supply store that won't become yellow over time. (Company : KREUL)

And I cover the pieces with cardboard so that they don't collect so much dust.

When I poured the resin into the pond and the lakes I saw again that the previous painting was probably nearly unnecessary because the painted structures almost disappeared.

As with the first swamp - I forgot to describe it back then - I added a few drops of blue and green ink into the resin and stirred it up with a brush to form some lighter or darker areas.


I covered them with cardboard after pouring the resin into the pits and put it away for the long drying process. (min. 24h)


Building a Modular Gaming Table - Part 10 / Day 7 - Brushy business

Today I dry brushed all the boards from yesterday and also painted the green color on the outside of the pieces. You may have noted this before and asked yourself what is is good for. The idea was to prevent light lines from being visible when some boards don't fit. The other aspect is, that I cover all free parts of the wooden boards with paint to keep moisture out.


Building a Modular Gaming Table - Part 9 / Day 6 - The Serial Filler

The result of some hours using the wood filler on the parts made before. I have never used so much of it in such a short time. Does not look like it, but I needed several hours to accomplish that.

Two more rough terrain boards: raised ground and a sandpit.


The outcome so far. Not finalized, the rivers still need paint and the boards some small plants to complete the picture.